Tutorial: Mvc application using Azure acs and forms authentication Part 3


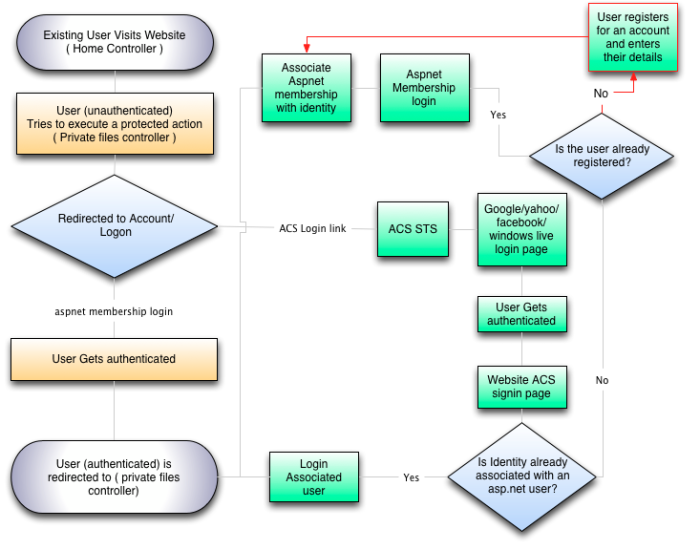
This is the final post in a series of posts on converting an asp.net mvc project to use both forms authentication and Azure appFabric Access Control Service (ACS) authentication. The first post focused on creating the project, configuring the site for acs and forms authentication and setting up the database. This second poste focused on the association process and the hybrid form where users can choose between forms authentication and ACS authentication. This final post will add some more steps to the original workflow which will cover user signup.

This simplifies the process for non-members who would otherwise have to signup then logout to begin the association process.

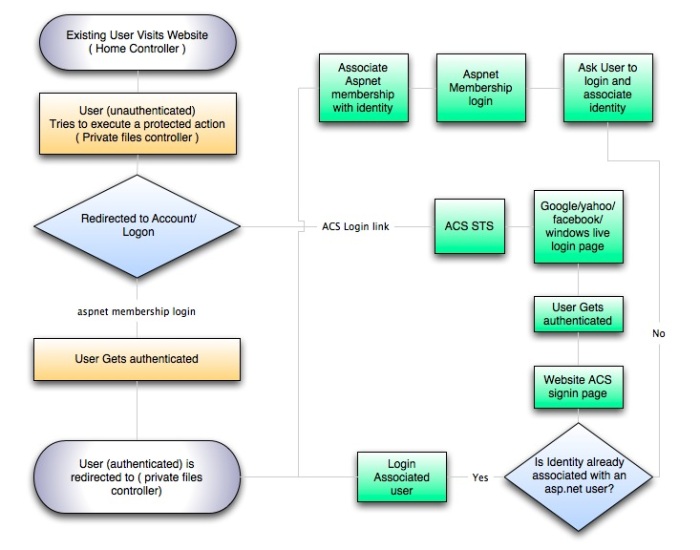
Original workflow:

New Workflow:

Open the MVC3MixedAuthenticationSample from the two previous posts and make the following changes:

Open Controllers\AccountController.cs and replace the Register(RegisterModel model) action with the following:

        [HttpPost]
        public ActionResult Register(RegisterModel model)
        {
            if (ModelState.IsValid)
            {
                // Attempt to register the user
                MembershipCreateStatus createStatus;
                Membership.CreateUser(model.UserName, model.Password, model.Email, null, null, true, null, out createStatus);

                if (createStatus == MembershipCreateStatus.Success)
                {
                    var claim = new IdentityClaim();
                    if (claim.HasIdentity)
                    {
                        var db = new IdentityRepository();
                        var user = Membership.GetUser(model.UserName);
                        db.MapIdentity(user.ProviderUserKey.ToString(), claim.IdentityProvider, claim.IdentityValue);
                        IdentityClaim.ClearSession();
                    }

                    FormsAuthentication.SetAuthCookie(model.UserName, false /* createPersistentCookie */);
                    return RedirectToAction("Index", "Home");
                }
                else
                {
                    ModelState.AddModelError("", ErrorCodeToString(createStatus));
                }
            }

            // If we got this far, something failed, redisplay form
            return View(model);
        }

Open Views\Account\LogOn.cshtml and find the following:

 $('#AssociateCancel').click(CancelAssociation);

Immediately below insert the following code:

         $('#AssociateRegister').click(function () {
            window.location = '@Url.Action("Register")';
        });

Next Find the following code:

<div id="AssociationMessage">
    <div id="AssociateMessageText">Please login to associate your account</div>
    <div id="AssociateMessageActions"><button id="AssociateCancel">Cancel</button></div> 
    <div class="clear"></div>
</div>

Immediately below insert the following code:

 <div id="AssociationMessageRegister">
    <div id="AssociateMessageRegisterText">Click Register if you don't already have an account</div>
    <div id="AssociateMessageRegisterActions"><button id="AssociateRegister">Register</button></div> 
    <div class="clear"></div>
</div>

Open Content\HrdPage.css and insert the following css:

#AssociateMessageRegisterActions
{
    float:right;
}

#AssociateMessageRegisterText
{
    float:left;
}

#AssociationMessageRegister
{
    border: 1px solid #9F6000;
    background-color: #FEEFB3;
    color:#9F6000;
    padding:5px;
    width:400px;
}

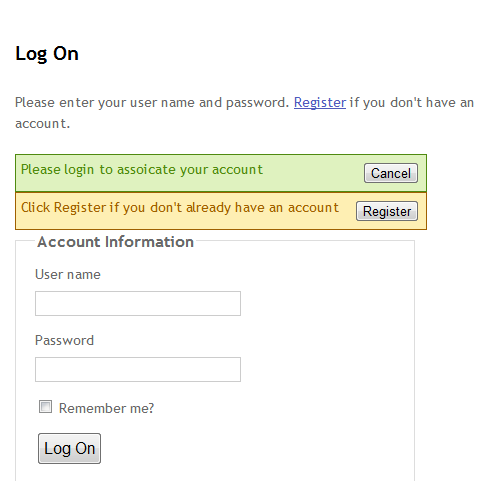
Next run the site and click one of the provider buttons and login with a provider account that is not already associated. You can also go to Account/Identites and remove any existing associations if you don’t have another one to spare.

When you return to the site your login page should look like this:
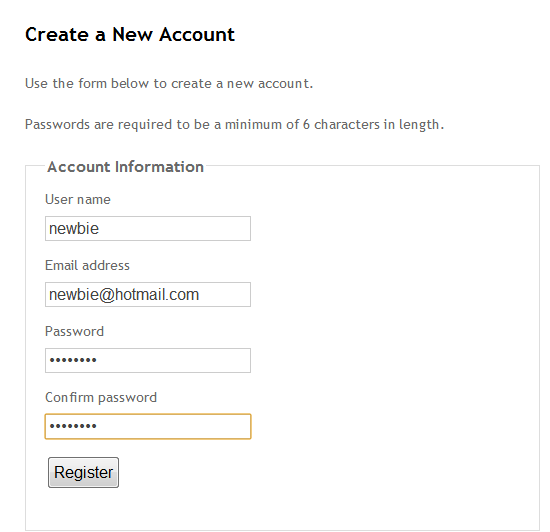
Register as normal:

Once the user completes registration they will be able to use their identity provider to access the site.
Tutorial: Mvc application using Azure acs and forms authentication Part 1


A few months ago I created a post which described a method for adding single signon services to an asp.net mvc website using Windows Azure ACS. The workflow involved allowing users to signup using forms authentication then associating their on-site identities with their facboook, google, yahoo and windows live identities. This post is meant to be a more detailed followup which will take you through  some other things not covered in my original post.

The tutorial steps are as follows:

  • Create an asp.net mvc 3 web application with forms authentication
  • Register a new user
  • Add Azure ACS sts reference to application
  • Alter web.config to allow both sts and forms authentication
  • Add database table to store mappings between identities and user accounts
  • Create a custom class for extracting required claims
  • Create a special controller action which Azure ACS will call to sign users in
  • Create Hybrid login page with new functions
    • Login with forms
    • Login with ACS
    • Prompt user to login and complete association process

Here is the workflow from the original post:

Assumptions about audience

Please ensure you have the following before proceeding with this tutorial

  1. Windows aure account
  2. Azure Access Control Services (ACS) working
  3. Windows Identity Framework Installed and working
  4. Basic understanding of Asp.net memberships
  5. Comfortable with Asp.net MVC
  6. Visual Studio 2010
  7. You have SQL express installed with required permissions
  8. You have experience with ACS/STS either through your own projects or tutorials such as on acs.codeplex.com
Again, If you have not been able to get ACS working using other samples and tutorials then it will be very difficult for you to follow this tutorial as I will not go into detailed explanations about setting up ACS, installing the Windows Identity Framework and Asp.net memberships.


Creating the Project

We will start by creating a new Asp.net MVC 3 project. I called mine MVC3MixedAuthenticationSample

Use the “Internet Application” template

Once the project is created add a reference to the Microsoft.IdentityModel assembly.

You should have a working Asp.net MVC 3 application at this point. The asp.net database will be created in the App_Data folder when we run the application.

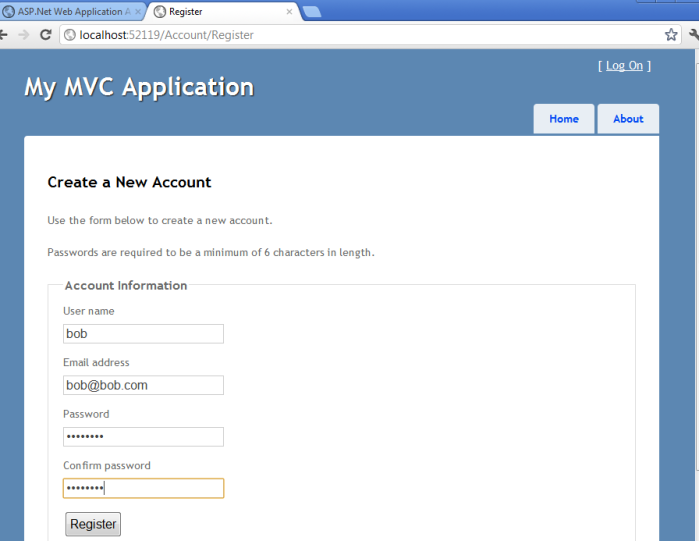
Now run the project and register a new user. I called mine bob and gave him the password ‘password’.

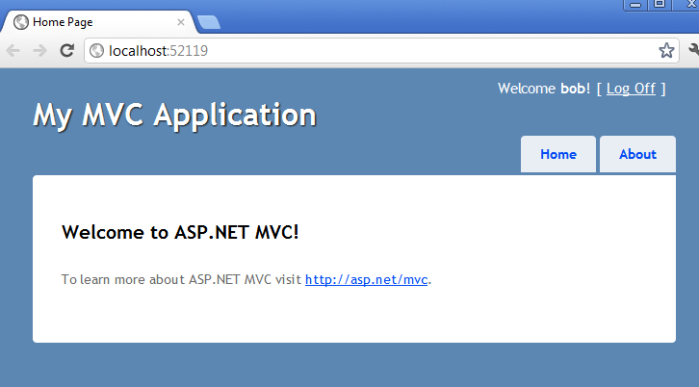
Your new user should now be logged into the site. You can also use the asp.net configuration tool to add a new user (you must build the project first). If you get any errors while attempting to add a new user you probably don’t have the correct permissions to the App_Data folder in the project or to sql express. There are several things you can try to resolve this issue that I can mention later if needed.

Our next step will be to include the newly created database in our project. This file is hidden by default so click the second icon from the left below “Solution Explorer” to show hidden files.

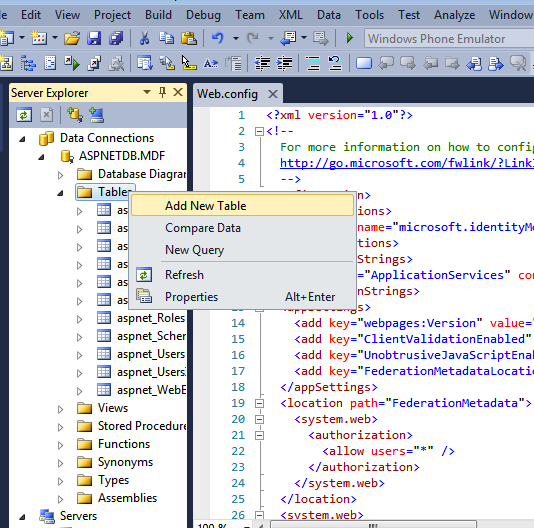
The database should now appear in the list of databases on the server explorer. Right click on the Tables node to add a new table.

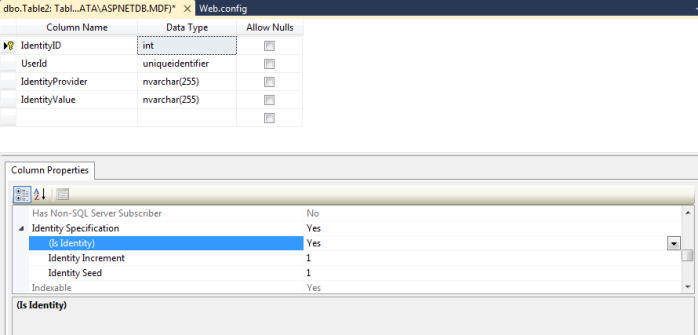
The new table will store the mappings between the acs identities and the local users.

Remember to enable auto increment for the primary key (IdentityID)

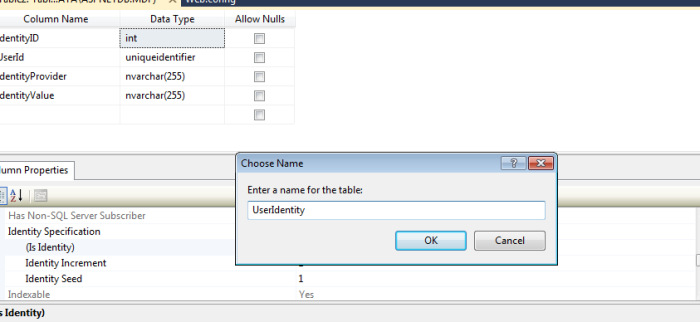
Save table and call it UserIdentity

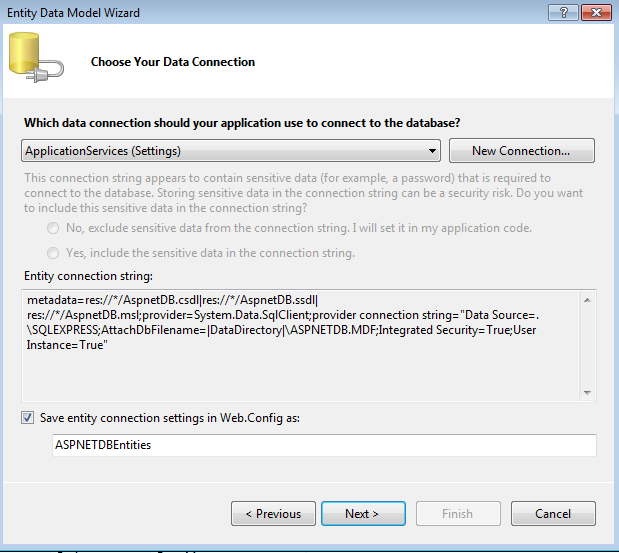
Now we need data access to our new table and any other tables related to it. I decided to use entity framework for this but you can use any ORM or simple ADO.NET if you like. Many people are reading this because they want to modify their existing projects so they may be using something else for data access. However, the principles are the same.

Create a new entity data model and opt to generate the entity from a database.

The “ApplicationServices” connection should already be selected. If not, select it. If it is not there, I would say add it but it not being there might be a symptom of a bigger issue.

Add the UserIdentity table to the model. I have the aspnet_users table selected but it is not required since we will be using the asp.net membership api for everything related to local users.

Now that the database and data access is setup we can add a reference to the Azure ACS STS.

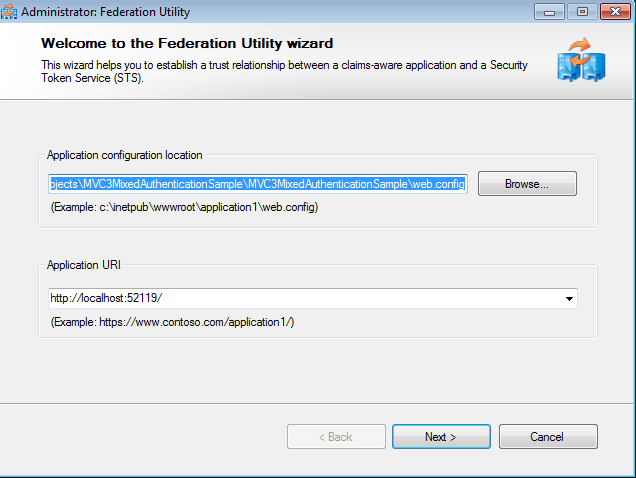
Please fill in the url for the mvc application

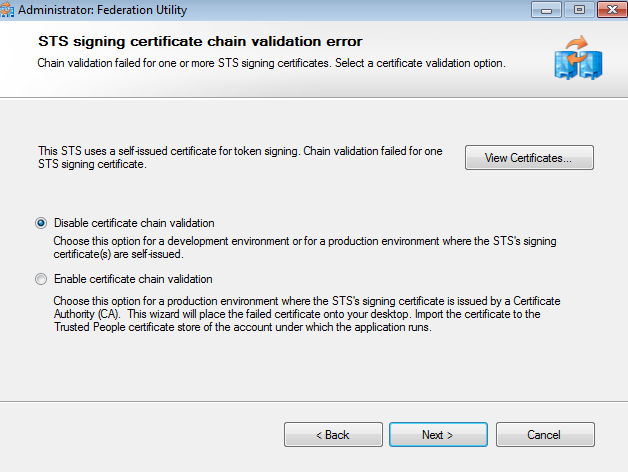
Select “Use an existing STS” and paste in the link to your ACS metadata. This can be found in your Azure control panel.

The following claims will be used to associate users with their identities

The wizard automatically disables forms authentication so the next step is to edit our web.config and turn forms authentication back on.

Open the web.config and find the attribute passiveRedirectEnabled and set  it to false.

<wsFederation passiveRedirectEnabled="false" issuer="https://[namespace].accesscontrol.windows.net/v2/wsfederation" realm="http://localhost:52119/" requireHttps="false" />

Find the following and comment it out:

<authentication mode="None" />

Find the following and uncomment it:

<!--<authentication mode="Forms"><forms loginUrl="~/Account/LogOn" timeout="2880" /></authentication>-->

Find the following and comment it out:

<authorization>
 <deny users="?" />
 </authorization>

At this point you should be able to login to run the application and login with the user you created at the beginning.

Next we will Create a new class called IdentityClaim which we will use to extract the claims from the sts response. I added mine to the Models folder. Please note the using statement for Microsoft.IdentityModel.Claims.

using System;
using System.Collections.Generic;
using System.Linq;
using System.Web;
using Microsoft.IdentityModel.Claims;

namespace MVC3MixedAuthenticationSample.Models
{
    public class IdentityClaim
    {
        private string _identityProvider;
        private string _identityValue;
        public const string ACSProviderClaim = "http://schemas.microsoft.com/accesscontrolservice/2010/07/claims/identityprovider";

        public IdentityClaim(IClaimsIdentity identity)
        {

            if (identity != null)
            {
                foreach (var claim in identity.Claims)
                {
                    if (claim.ClaimType == ClaimTypes.NameIdentifier)
                    {
                        _identityValue = claim.Value;
                    }
                    if (claim.ClaimType == ACSProviderClaim)
                    {
                        _identityProvider = claim.Value;
                    }

                }
            }

        }

        public IdentityClaim()
        {
            _identityProvider = HttpContext.Current.Session["IdentityProvider"] as string;
            _identityValue = HttpContext.Current.Session["IdentityValue"] as string;
        }

        public bool HasIdentity
        {
            get
            {
                return (!string.IsNullOrEmpty(_identityProvider) && (!string.IsNullOrEmpty(_identityValue)));
            }
        }

        public string IdentityProvider
        {
            get
            {
                return _identityProvider;
            }
        }

        public string IdentityValue
        {
            get
            {
                return _identityValue;
            }
        }

        internal void SaveToSession()
        {
            HttpContext.Current.Session["IdentityProvider"] = _identityProvider;
            HttpContext.Current.Session["IdentityValue"] = _identityValue;
        }

        public static void ClearSession()
        {
            HttpContext.Current.Session.Remove("IdentityProvider");
            HttpContext.Current.Session.Remove("IdentityValue");
        }

        public static string ProviderNiceName(string identityProivder)
        {
            if (identityProivder.ToLower().Contains("windowslive"))
                return "Windows Live";

            if (identityProivder.ToLower().Contains("facebook"))
                return "Facebook";

            if (identityProivder.ToLower().Contains("yahoo"))
                return "Yahoo";

            if (identityProivder.ToLower().Contains("google"))
                return "Google";

            return identityProivder;
        }
    }

}

In my next post I will talk about creating the new controller action that will support Azure ACS signin and modifying the generated logOn page to include both the ACS buttons and the regular forms authentication option.

Azure Acs plus asp.net MVC memberships


Over the past week I have been trying to get up to speed with the concept of claims aware applications, the windows identity foundation framework and the Azure AppFabric access control service. I was asked to look into this as an option for allowing customers to login to our website with their existing windows live, Google, Yahoo and Facebook logins. I had the following requirements:

  • Minimal effort in terms of new code,classes or complexity added.
  • Minimal changes to existing login/authentication workflow (our site uses a custom asp.net membership provider but still uses iPrincipal).
  • The login page should have the login/password control and the links/buttons to login using Google/Yahoo/Windows Live/Facebook.
  • This should work on any of our website’s wildcard subdomains.

After Googling, reading MSDN and doing a couple walkthroughs I finally figured out a way to achieve most of my requirements. During my search I found quite a few people trying to find a way to add single signon services to their asp.net websites using ACS (Azure App Fabric Access Control Service) and other Secutirty Token Services (STS). Although it doesn’t fulfill all of my requirements, I figured someone might find what I came up with useful. I have not figured out how to fulfill the final requirement because ACS requires the replying party information before hand. There is no room for wildcard urls and therefore I have no idea how I  could allow a single site such as a dotnetnuke site or a website with wildcard subdomains to act as a relying party for all child sites. If anyone has any ideas let me know. I am thinking ACS OAuth2 but I have not looked into it yet.

If you have an existing website and simply want to add a “login with facebook” button on your login page, I doubt you are looking to  delegate your entire authentication and authorization system to ACS or any other external STS.  Unfortunately, the samples and documentation I came across (Very good BTW) cover the broader concept of federation and claims both as an option for removing authorization and authentication logic from your application and streamlining trust relationships between internal an external parties. The parties in the examples usually have most if not all the claims required for a user to interact with a system. Unfortunately, The default identity providers available in the ACS ( Facebook, Yahoo, Google, Windows Live) only offer enough information to identify a user by name, email or a unique id. Windows live only offers the latter. This means that you can’t use their limited claimset for anything more than an identifier (this is really all we need). My goal here is to allow users to associate their identities to their existing asp.net membership accounts by adding a few steps to the existing authentication workflow.

The following graphic is a simplified representation of the workflow.

In the workflow, the “website ACS signin page” is the url you tell ACS to send the user to after they have been successfully authenticated. This is the place where I check the identity claim against the database and sign in the appropriate user. By the time execution gets to the “website ACS signin page” the ClaimsPrincipal is set and the authentication module cookie is set so after I get the identity claims from the ClaimsPrincipal I delete the authentication module cookie and reset the principal to the associated user. If the user is not already associated, they are taken through the association process. It is also possible to add a new user signup to the association process.  I decided to store the association information in a table called UserIdentity which I  access with Entity framework using linq. This table has a row for each of the user’s identities (1 for google, 1 for yahoo, 1 for windows live etc).

Table Structure

Sample Data

Corresponding linq query on “website ACS signin page”.

//Extract claims
var identityClaim = new MyIdentityClaim(HttpContext.user as ClaimsPrincipal);

//Delete session cookie so the module cannot reset principal
SessionAuthenticationModule sam = FederatedAuthentication.SessionAuthenticationModule;
sam.DeleteSessionTokenCookie();

if(identityClaim.HasIdentity)
{
var db = new identityEntities();
var userid = (from ui in db.UserIdentity
               where ui.IdentityValue == identityCliam.IdentityValue && ui.IdentityProvider == identityClaim.IdentityProvider
               select ui.UserId
             ).FirstOrDefault();

   var user = Membership.GetUser(userid);
   if(user!=null)
   {
         FormsAuthentication.SetAuthCookie(user.UserName, false);
   }
   else
   {
       //Save identity values for processing in the association page
       identityClaim.SaveToSession();

      //Send user into the association process
      return RedirectToAction("Associate", "Account");
   }

}

EDIT:
Here is the code for MyIdentityClaim


    public class MyIdentityClaim
    {
        private string _identityProvider;
        private string _identityValue ;
        public const string ACSProviderClaim = "http://schemas.microsoft.com/accesscontrolservice/2010/07/claims/identityprovider";

        public MyIdentityClaim(IClaimsIdentity identity)
        {
           
            if (identity != null)
            {
                foreach (var claim in identity.Claims)
                {
                    if (claim.ClaimType == ClaimTypes.NameIdentifier)
                    {
                        _identityValue = claim.Value;
                    }
                    if (claim.ClaimType == ACSProviderClaim)
                    {
                        _identityProvider = claim.Value;
                    }

                }
            }


        }

        public bool HasIdentity
        {
            get
            {
                return (!string.IsNullOrEmpty(_identityProvider) && (!string.IsNullOrEmpty(_identityValue)));
            }
        }

        public string IdentityProvider
        {
            get
            {
                return _identityProvider;
            }
        }

        public string IdentityValue
        {
            get
            {
                return _identityValue;
            }
        }


    }

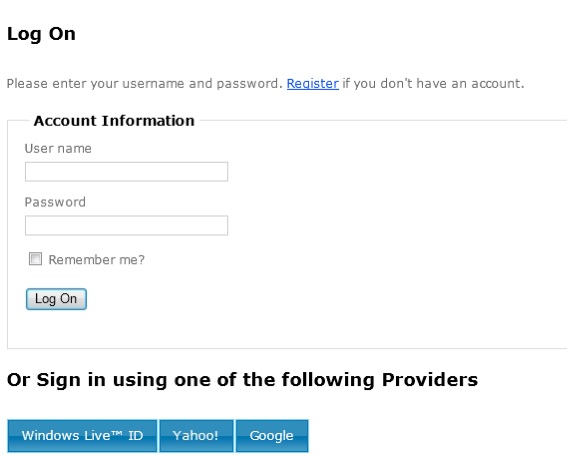
Now you can  add your “login with facebook” button on your Aspnet member ship website with minimal changes to your existing code. Here is my modified signin page.

I used the MVC3CutomSigninPage sample found here as a starting point for my proof of concept. This sample also shows you how to get the list of available providers from ACS to create the blue buttons seen above. I don’t have time to create a full walkthrough but I believe the information I provided should help people get over that hump. I will be happy to answer questions.

EDIT:
Download the acs samples here. The MVC3CutomSigninPage sample can be found in the ‘Websites’ folder. The online readme file for this sample can be found here. You can add the code I provided after getting the sample to work.

After you have confirmed acs is working you can change the web.config back to forms authentication:

  <authentication mode="Forms"><forms loginUrl="~/Account/LogOn" timeout="2880" /></authentication>

Also make sure passive redirect is disabled:

<wsFederation passiveRedirectEnabled="false" issuer="https://[namespace].accesscontrol.windows.net/v2/wsfederation" realm="https://yoursite.com/" requireHttps="true" />